


Author: Lisa Yashina, Security Industry Expert
Published: June 30, 2026
A CCTV layout planner will help you create clear, professionally designed CCTV diagrams that are easy to explain. Your installation team can see what needs to be done, and your customer can quickly understand where the cameras will go, which areas they will cover, and what they are paying for, even if they know nothing about CCTV.
With IP Video System Design Tool, you can create a detailed CCTV floor plan. Add cameras to the plan, check coverage, plan cable routes, estimate storage and prepare the documentation in one project. For most projects, you can get all of this done in just 30 minutes.
What Is a CCTV Layout Plan?
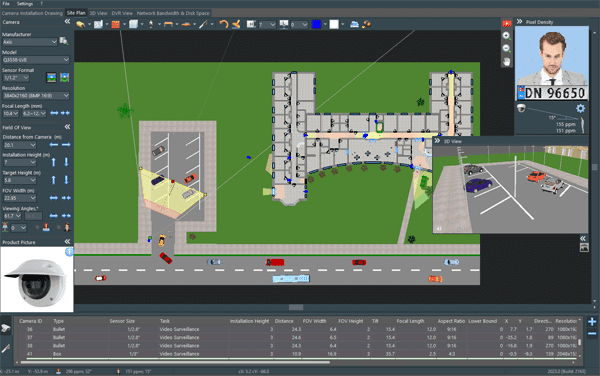
A CCTV plan shows where cameras will be installed, what each camera will see and how clear the image will be at different distances. It should include the floor plan, camera locations and viewing angles, coverage zones, and pixel density so you can see whether there is enough detail to identify a person’s face.
A good camera layout should help answer practical questions before installation begins:
- Are entrances, exits and restricted areas covered?
- Can the camera identify a person where identification is needed?
- Are there blind spots behind walls, shelves, vehicles or equipment?
- Is the chosen lens suitable for the distance?
- Where will cables, switches and recording equipment be located?
- Will the installer understand the project without having to guess?
That is why a professional CCTV layout is more useful than a few camera symbols placed on a drawing.

From a CCTV Drawing to a Working Design
A basic CCTV drawing can show where the cameras will be installed. It is a good first step, but it does not show whether the camera will give you a clear enough picture.
For example, a camera may point at a doorway but still be too far away to show a clear face. A wide-angle camera may cover a whole warehouse area, while people or product labels in the distance remain too small to recognise.
A good CCTV camera diagram should show more than camera icons. It should help you see what each camera covers, how much detail you can expect and where blind spots may appear.
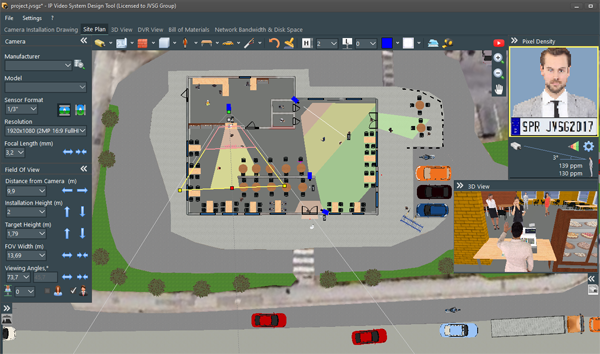
In IP Video System Design Tool, you can place cameras on a 2D plan, choose a real camera model, adjust its viewing angle and focal length, then check pixel density using the familiar DORI standard or the newer OODPCVS standard from IEC/EN 62676-4:2025. You can also switch to 3D to see the expected camera view and spot anything that may block it. This helps you find problems while the project is still on screen, before the cameras are installed and the cables are in place.
How to Create a CCTV Camera Layout
1. Start with a Floor Plan
Start with the plan you already have. You can upload a JPEG, PNG, PDF, TIFF file or an AutoCAD DWG drawing, then set the scale before adding cameras.
2. Decide What Needs Protection
Before placing cameras, walk through the site or review it carefully with the customer. The goal is not to cover every square metre equally. The goal is to cover the areas that matter most.
Typical priority areas include:
- Main entrances and emergency exits
- Reception areas and visitor access points
- Cash registers and point-of-sale zones
- Vehicle gates and parking areas
- Restricted rooms, server rooms and storage areas
- Perimeter fences, gates and access roads
Focus on the areas that need protection most, not on placing cameras evenly around the building.
3. Place Cameras and Check Their Coverage
Once the key areas are marked, place cameras on the plan and adjust their mounting height, focal length.
The objective is not simply to show the largest possible area. A camera needs to provide enough detail for its job. At an entrance, you may need identification. In a corridor, observation may be enough. At a vehicle gate, you may need to read a licence plate or see the driver clearly.
A clear CCTV diagram drawing should show camera coverage zones and how much image detail you can expect at different distances. A 3D view makes the project even easier to explain: the customer can see what their future cameras will see and how clear the image will be before installation begins.
4. Look for Blind Spots and Obstacles
Even a well-planned 2D layout can hide problems. Shelves, walls, parked trucks and other objects may block the camera view.
This is where 3D planning becomes especially useful. You can see the expected camera view from the mounting position and check whether the target area is really visible.
Finding these issues before installation is much easier than moving cameras later, especially on a warehouse, factory or multi-building project.
5. Plan Cables, Storage and Network Requirements
A complete CCTV layout also needs installation details. Once the cameras are in place, you can calculate or plan:
- Cable routes and cable lengths
- Bandwidth requirements
- Video storage capacity
- Equipment lists and reports
Keeping everything in one project means you do not have to switch between the floor plan, spreadsheets and separate equipment lists.
What Should a Simple CCTV Layout Plan Include?
A simple CCTV layout plan does not need to be complicated. It should still give everyone involved a clear picture of the system.
At a minimum, include:
- Walls, doors, rooms and major obstacles
- Camera locations and camera IDs
- Camera zones
- Important monitored areas
- The location of the recorder, network cabinet or security room
- Basic cable routes
For a larger commercial or industrial project, you may also need camera specifications, DORI analysis, storage calculations, cable lengths and an equipment list.
Why Use a CCTV Layout Planner Instead of Drawing by Hand?
Every CCTV project needs a clear layout that can be updated when the site or the customer’s requirements change.
Perhaps an entrance is moved. A new loading zone is added. The customer wants a different camera model. Or you discover that a lens needs to be changed to achieve the right level of detail.
With a dedicated CCTV layout planner, those changes can be made in the same project instead of rebuilding the whole CCTV plan from scratch. It also gives customers a more professional way to review the design and gives installers clearer information to work from.
Looking for a Security Camera Layout Planner Free?
People searching for a security camera layout planner free are usually trying to test a workflow before investing in software. That makes sense, especially for smaller installations or for teams that are moving away from paper plans and spreadsheets.
For a simple project, basic camera symbols on a plan may be enough. But when coverage validation, DORI, cable routing, storage calculations and client-ready documentation are important, it helps to use a tool built specifically for CCTV design.
IP Video System Design Tool offers a free trial, so you can test 2D and 3D planning, camera placement, coverage analysis, calculations and reporting with a real project. It also has a freemium mode that lets you work with one camera for free, with no time limit.
Create Better CCTV Diagrams with IP Video System Design Tool
IP Video System Design Tool brings the main parts of CCTV design together in one place. You can create a CCTV diagram, build a detailed floor plan, check camera coverage and prepare documentation without moving between several different tools.
- Create 2D camera layouts on site plans
- Build 3D scenes to find visibility issues and blind spots
- Select cameras from a multi-vendor database
- Check DORI and pixel density
- Calculate storage, bandwidth and cable lengths
- Prepare equipment lists and project reports
- Export documentation for customers and installers
Whether you are planning a small office, a warehouse, a shop or a complex multi-building site, a well-prepared CCTV layout helps everyone understand what will be installed and why.
Start with a floor plan, place the cameras, check the coverage and turn the idea into a project that is ready to discuss, approve and install.
Frequently Asked Questions
What is a CCTV diagram?
A CCTV diagram is a visual overview of a surveillance system. It may show camera locations, coverage zones, cable routes, recorders, network switches and important monitored areas.
How do I create a CCTV floor plan?
Start with a building plan, set the scale, identify priority areas, place cameras and adjust their fields of view. Then check for blind spots and, where needed, calculate storage, bandwidth and cable requirements.
What is the difference between a CCTV drawing and a CCTV layout?
A CCTV drawing may show only where cameras will be installed. A CCTV layout is usually more detailed and can include viewing angles, coverage zones, camera specifications, cable routes, equipment locations and technical calculations.
Can I use a CCTV layout planner for large projects?
Yes. A CCTV layout planner is especially useful for warehouses, factories, campuses, retail sites, parking areas and multi-floor buildings, where coverage and installation details are harder to manage manually.
Why is 3D CCTV planning useful?
3D planning helps show blind spots caused by walls, shelves and other obstacles. It also gives customers a clearer idea of what each camera is expected to see before the system is installed.